Soil Test 5: POM (Particulate Organic Matter)
Purpose: to estimate the amount of easily decomposable organic matter, an important source of energy for soil organisms and a driver of soil fertility.
Material needs:
Plastic bottle with 2 mm holes, 250-micron mesh bag, pre-weighed cloth, tube (e.g. cut-open plastic bottle) and rubber bands to mount cloth on, bucket, water (approx. 3-5 L), decanting cup (e.g., beaker with volume approx. 300-500 mL), ideally a spray bottle, one balance that is able to weigh 100 g of soil with precision of one decimal (0.1), and if available another balance that is able to weigh to a precision of 10 (0.01 g) or 1 mg (0.001)), spoon, ruler.
Time estimated: 20 minutes
Step-by-step instruction:
- Place the bottle with the 2 mm holes in the 250-micron mesh bag to form two "layers" of screen material through which the soil must pass. Either secure the mesh bag with a rubber band, or hold it firmly against the bottle during step 4.
- From the composite sample taken from all 5 sampling locations (see Soil Sampling Manual), weigh out 100g of soil. If possible, sieve the soil (5mm) and mix well. If the soil is not sieved, remove large stones and large pieces of organic matter (> 5mm). Use the open tube (cut plastic bottle) as funnel to add 100g (precision of one decimal) of the well-mixed soil sample to the bottle with holes. Make sure all soil enters the bottle but don’t worry if a little soil already leaks through the holes and the mesh while filling in. Put on the bottle cap.
- Holding the bottle inside the mesh, immerse and shake the bottle / mesh / soil vigorously in the bucket of water. Silt and clay particles will start to come out of the mesh bag. Take care that no soil leaves through the mouth of the bottle.
- After approximately 3 minutes, examine the material inside the bottle. This should contain only large roots and / or stones > 2mm to continue with the next step. If soil aggregates or lumps are still present, it is necessary to break them gently by inserting a stick into the bottle or simply continue shaking the bottle in the bucket.
- Once there are only stones and larger pieces of organic matter in the bottle, remove it from the bag and rinse the outside of the bottle with some water into the mesh bag, so that any material between 250 microns and 2 mm is kept in the bag and not lost.
- Some soils may contain very strong aggregates of soil that will hold together in the mesh bag, even after shaking. If you notice this, you should gently massage the bag with your hand to break up these soil crumbs and free any organic matter and clays that will be then rinsed in the next step.
- Rinse the mesh bag one more time in some clean water to make sure all clay and silt particles are removed.
- Release the contents of the mesh bag into a beaker used as decanting cup, measuring cup, or other. Use a spray bottle to wash all material in the bag into the container.
- Mount the pre-weighed cloth on the end of the plastic cylinder (cut-open jar or similar), using rubber bands.
- Decant the floating POM from the decanting cup into the plastic cylinder with the cloth attached, making sure that mineral soil particles (mostly sand) stay at the bottom of the decanting cup. Refill the decanting cup with water repeatedly, shake lightly to separate less dense POM from the mineral particles and pour into the cylinder with cloth attached. Make sure to separate most of the particles that look organic (darker), but that are left at the top of the layer of mineral particles (their density is between the density of the mineral particles and the density of POM). It may not be possible to capture every last piece of POM and at some point you will need to call the evaluation finished.
- Continue this decanting process until the water above the sand washed in the beaker is free of almost all particles, and nearly 100% of the POM has been captured in the cloth. When finished, rinse the sides of the plastic tube onto the cloth.
- For a semi-quantitative assessment of the amount of POM, move all material to the center of the cloth and distribute it to form a circle of approximately 1-2mm height. Use the ruler to measure the diameter of the circle.
- If a precise balance is available, dry the cloth with POM and weigh for a quantitative assessment (up to 3 decimals) and send us the weight. If no balance is available, place the dried cloth with the POM into a sealable plastic bag and store with the soil sample collected, and send it to us.
Video tutorial: https://youtu.be/cL_nWS_xWAw (To open the video, do not click on the link, but copy and paste it into your browser)
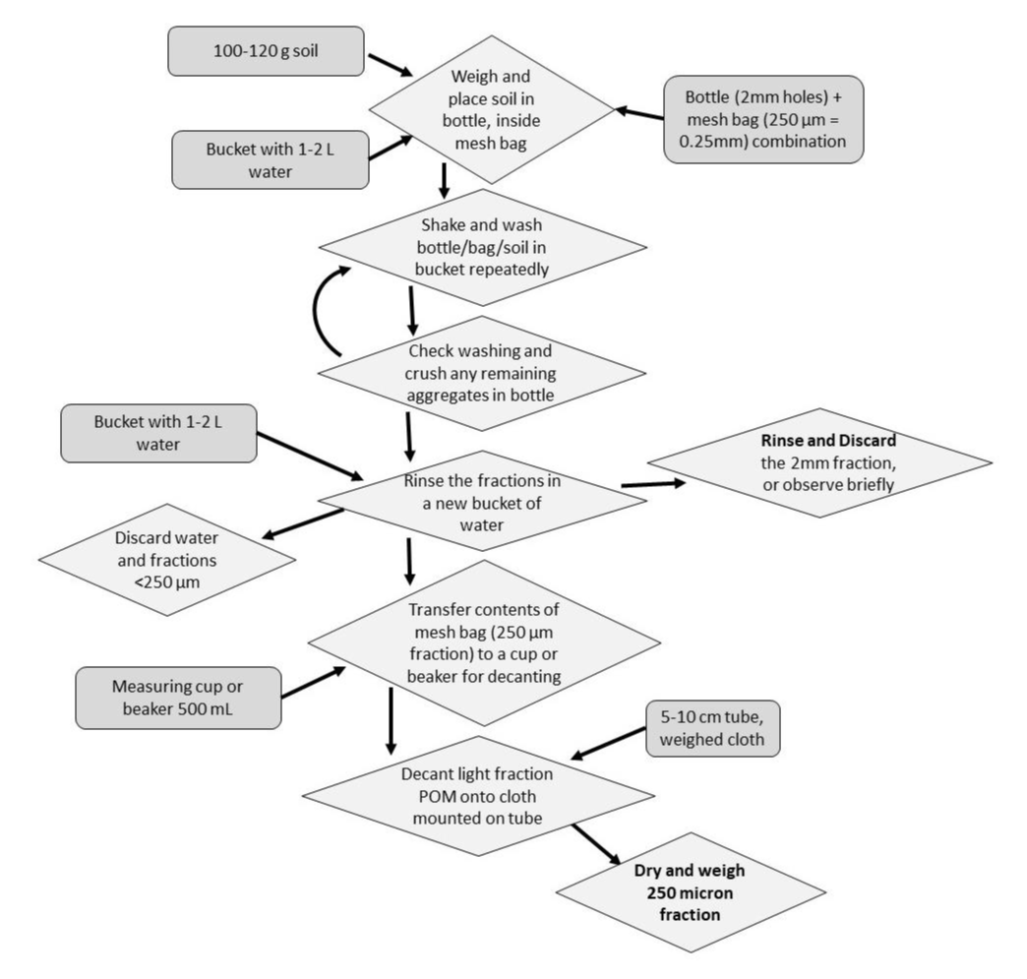
Figure 3 Flowchart for the streamlined POM method instructions.
Form
- Visual Score of POM circle: _______
- Initial (cloth weight) and final weight after drying: _______
- References
McKnight Foundation, Soil Health Evaluation Manual, Manual of Protocols: Soil Health Assessment, Version 6.4 July 2020
App herunterladen und registrieren
Standort beschreiben
Falls du kein Smartphone besitzt oder aus anderen Gründen lieber mit einem PC teilnimmst, navigiere zur Karte.
Wie hat es denn beim Kabarettisten Simon Enzler funktioniert?