protocols
Here you find detailed protocols for the different soil health assessments, which are also included in the "Beweisstück Unterhoe" app.

Purpose: to estimate soil texture (sand, silt, clay proportions) by hand, which influences many soil properties (water retention, nutrient supply, workability) and to get in first contact with the soil.
Material needs: Digging spade, water (best in a spray bottle), tarp / bin bag /tray
Time estimated: 10 minutes
Step-by-step instruction:
- Dig a hole of approximately one spade blade’s depth and 20 cm on each side. It should be slightly wider than the spade. Try to keep one side of the hole as intact as possible to use it for the VESS spade test (Soil test 2). Place the excavated soil on a tarp or in a box for performing Earthworm counts (Soil Test 3).
- Take a representative mix of the excavated soil (use a mix of soil from approximately 5- 20 cm depth, avoid the top layer with plant material, if present).
- Perform the soil texture analysis as described in the diagram below.
Info: “Gritty” feels like (parts) of sandpaper/ can feel individual kernels,
“smooth” feels like wet flour or baby-powder.
Video tutorial: https://www.youtube.com/watch?v=W0osjN0t-Ho (To open the video, do not click on the link, but copy and paste it into your browser)
Link to Flowchart:
https://www.nrcs.usda.gov/sites/default/files/2022-11/texture-by-feel.pdf
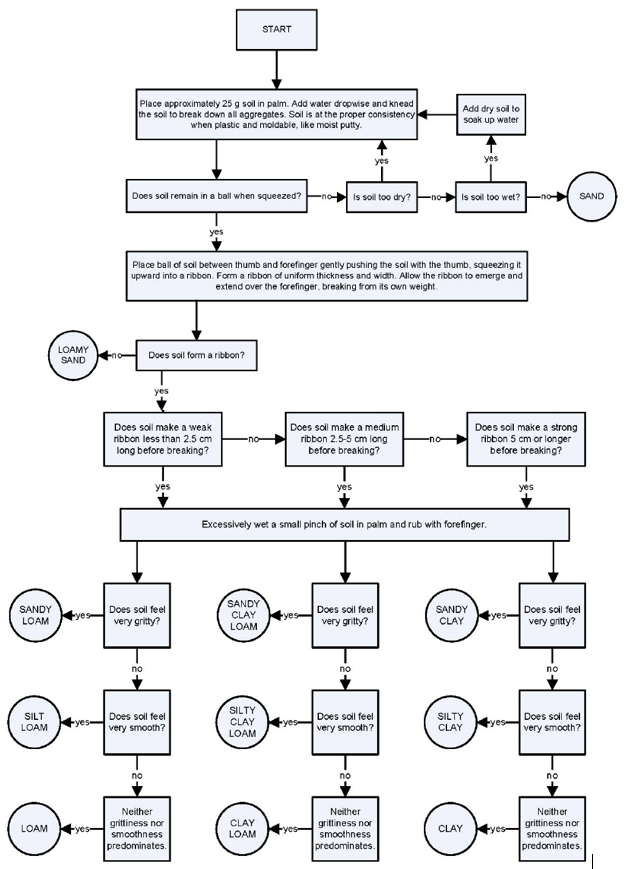 Figure 1 Soil texture by feel instruction. https://www.nrcs.usda.gov/sites/default/files/2022-11/texture-by-feel.pdf
- References
Thien, S. J. (1979). A flow diagram for teaching texture by feel analysis. Journal of Agronomic Education, 8(1), 54–55. Modified and reproduced in USDA Soil Texture by Feel. Retrieved from https://www.nrcs.usda.gov/sites/default/files/2022-11/texture-by-feel.pdf
PDF Version:
Purpose: to assess soil structure quality, rooting conditions, and porosity by examining soil aggregates and layers, key factors affecting most soil functions.
Material needs:
VESS score chart, digging spade, ruler, tarp / bin bag /tray, camera (on phone)
Time estimated: 20 minutes
Step-by-step instruction:
- In case, you did the Soil Test 1, skip directly to point 2. Otherwise, dig a hole of approximately one spade blade’s depth and 20 cm in length. It should be slightly wider than the spade. Try to keep one side of the hole as intact as possible to use it for the spade test. Place the excavated soil on a tarp or in a box to put it back later.
- Excavate an intact block of soil from the intact edge of the hole as follows: Insert the spade vertically on either side of the block to be excavated (one side being the left intact edge from step 1). Alternatively, you can cut slits into the sides of the block with a knife. If the soil is sticky or heavily covered, stabilise the soil surface with your feet when pulling out the spade.
- Then insert the spade vertically into the soil at a distance of approx.10 cm from the hole, parallel to the left-intact edge. Separate the soil tile from the remaining soil volume by pushing the spade slightly forward with your shoulder.
- Use the spade like a lever and carefully lift the sample out of the hole. Stabilise the block with your hand, or use a second spade in front of the soil block and tip the block onto it. Place the block on a plastic tarp.
- Open the block in the middle and push both sides by hand like opening a book to reveal undisturbed areas. Place a meter rule next to the block and take a picture.
- Distinguish soil layers by watching out for changes in colour, soil type, structure, etc. Use your hands to separate the layers into their natural components (the aggregates, see explanation and example images) and note whether you need a lot or a little force to do so. With the form, you will be guided step by step through the description of the layers. Beware, in case you have a clayey or sandy soil (see results from Soil test 1), the possible answers change (in the App, this happens automatically)!
Video tutorial: https://www.youtube.com/watch?v=y5x6Er-L-3E (To open the video, do not click on the link, but copy and paste it into your browser)
Form
- Soil surface description:
Aggregates intact, easily recognisable, permeable surface /
Aggregates partially washed out, surface still rough or uneven /
Aggregates washed out, surface sealed, silted, or compacted, less permeable /
Closed crust, deposited sediments, compacted, very poorly permeable /
- General sample observations:
Rocks / Bad smell / Plow pan / Undecomposed residues / Straw mat / Difficulty digging / Rust stains / Plastic pieces / None
- Number of soil layers: _______
- Depth of layers (cm): _______
Record the following values for each layer separately:
- Aggregate size (mostly): <0.6 cm / <1 cm / 1-2 cm / 2-5 cm / 5-10 cm / >10 cm / a continuous block
- Aggregate form:
All soil types but clayey or sandy: rounded / angular to rounded / angular / sharp-edged
Clayey soil: rounded / angular to rounded / angular or sharp-edged / Very sharp-edged with conchoidal fracture
Sandy soil: No aggregates, only individual grains / rounded / angular to rounded / angular or sharp-edged
- Aggregate porosity:
Porous, many pores / few pores, macropores and cracks possible / dense, no pores or only individual macropores or cracks
- Aggregate stability:
All soil types but clayey or sandy: disintegrates easily, flaky, crumbly, unstable/ little force, stable / great force, hard
Clayey soil: Can be crushed with little force / Can be crushed with more force, but only with the fingers / Can only be crushed with a lot of force of the whole hand
Sandy soil: Disintegrates by itself / Some cohesion, can be crushed with very little force / Can be crushed with little force, stable
- Root description:
Many roots, evenly distributed, finely branched / Few roots, evenly distributed / Unevenly distributed, root-free zones, stunted roots, root clustering around aggregates/ none
- VESS score (see provided VESS score chart): _______
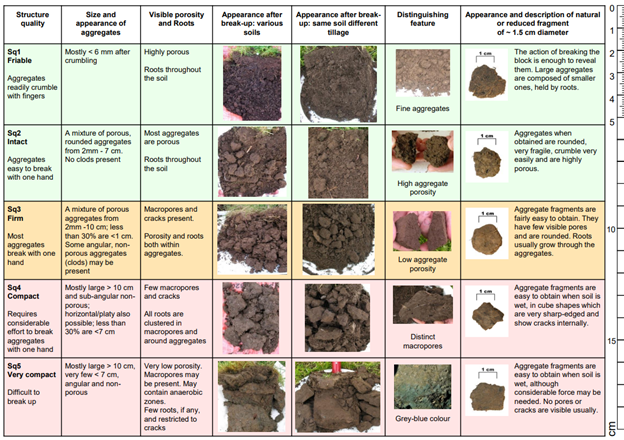
Figure 1 VESS score chart
- References
Burgos, S., Dakhel-Robert, N., Weisskopf, P., Johannes, A., Kellermann, L., Niggli, J., van Geijtenbeek, S., Spuhler, M., Nilles, L., Bünemann-König, E., & Heller, O. (n.d.), Weisskopf, P.. Spatenprobe. Retrieved from https://spatenprobe.ch/
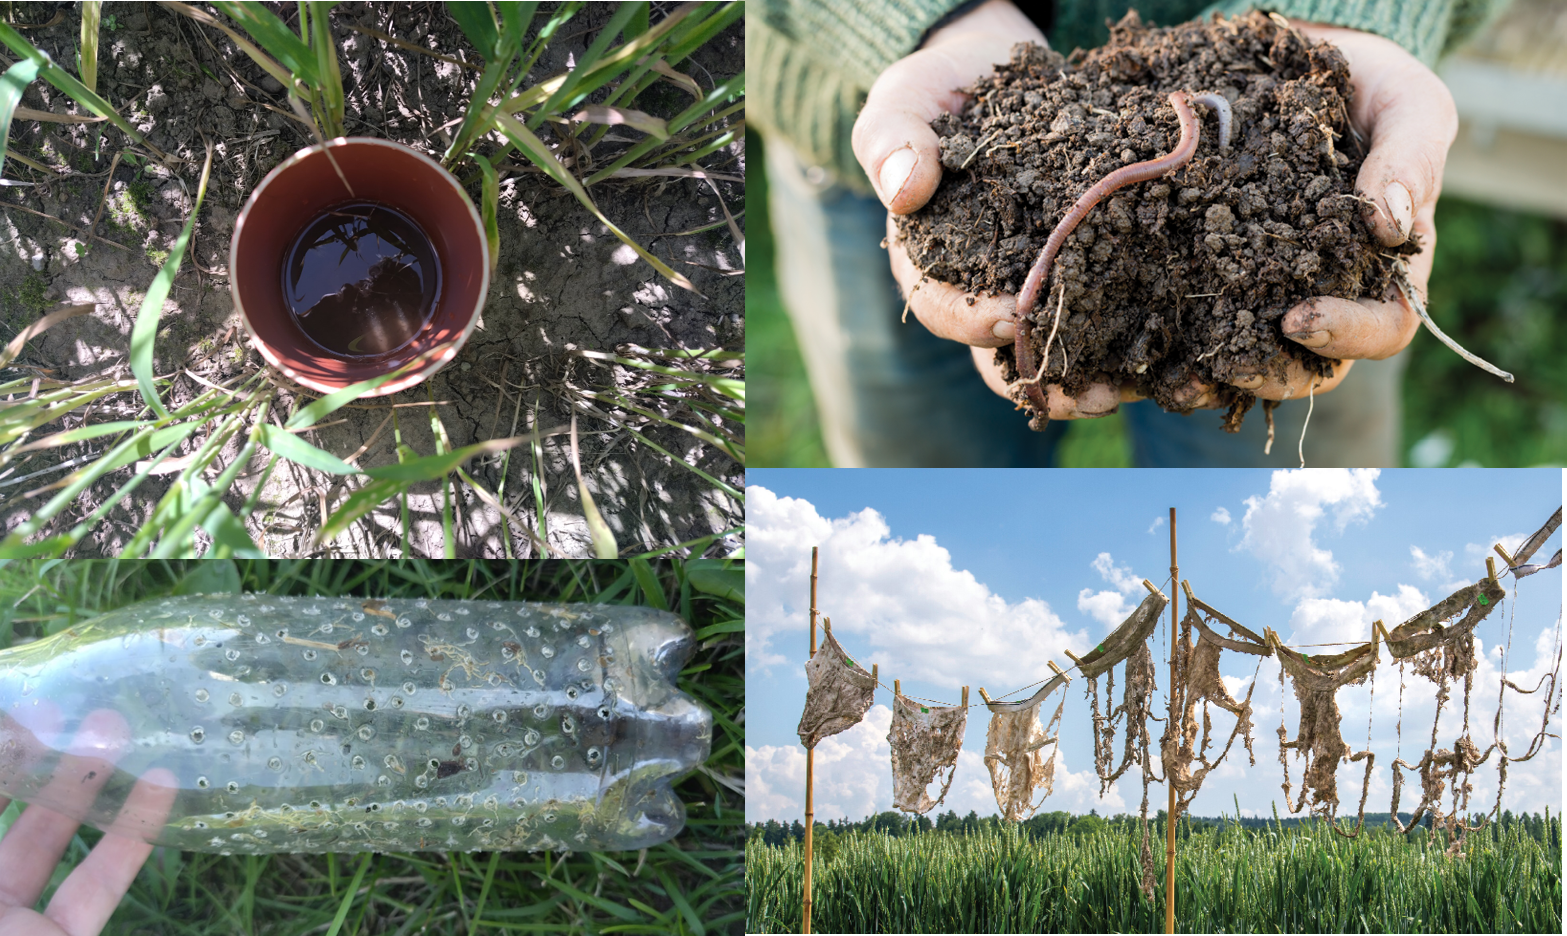
Purpose: to measure earthworm abundance as an indicator of biological activity, organic matter turnover, and soil health.
Material needs: Digging spade, balance.
Time estimated: 10 minutes
Step-by-step instruction:
- If you have already performed Soil Test 2, use the excavated soil volume of the VESS spade test (Test 2) (20 × 20 × 30 cm) that you placed on a tarp or in a box.
- Otherwise, dig a 20 × 20 × 30 cm hole and place the soil on a plastic tarp or in a box.
- Carefully separate the soil, break up aggregates and count all earthworms. It is important to break up all soil aggregates as earthworms can hide inside. However, try not to mix the upper soil (top 20 cm) with the lower soil, as we will need the upper soil for Soil Test 5.
- Record the total number of earthworms found and write the weight down (try to remove soil particles).
- Note additional observations such as burrows or faeces.
Form
- Number of earthworms in 20 x20 x30 cm soil volume: _______
- Weight of earthworms in 20 x20 x30 cm soil volume: _______
- Note other observations (ducts, faeces, etc.):
- References
D’Hose, T., Molendijk, L., Van Vooren, L., van den Berg, W., Hoek, H., Runia, W., ... & Ruysschaert, G. (2018). Responses of soil biota to non-inversion tillage and organic amendments: An analysis on European multiyear field experiments. Pedobiologia, 66, 18-28.
Purpose: To determine soil acidity or alkalinity, which affects nutrient availability and plant growth.
Material needs: Hellige pH indicator liquid, pH color scale, spoon
Time estimated: 5 minutes
Step-by-step instruction:
- Place a small amount of soil of the top 10 cm into the round depression of the measuring plate (or saucer).
- Cover the soil with the color indicator and mix thoroughly.
- Wait for about 2 minutes.
- Slightly tilt the plate so that the liquid flows into the channel / along the outer edge of the saucer.
- Compare the color of the liquid with the printed color scale.
- Record the corresponding pH value.
Video tutorial: https://www.youtube.com/watch?v=pHKBRuYgiok (Enable auto-translation. To open the video, do not click on the link, but copy and paste it into your browser)
Form
- Final soil pH value: _______
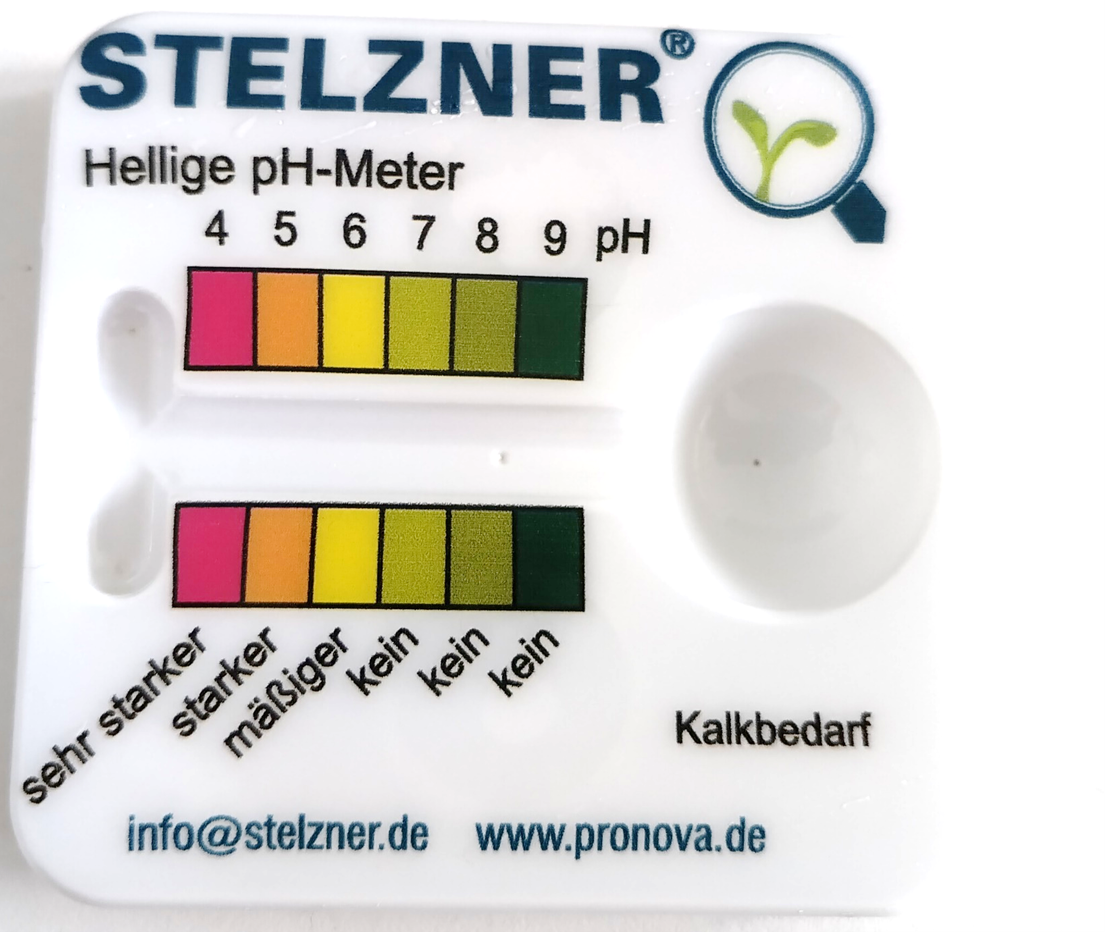
Figure 1 pH color scale
- References
Pronova Analysentechnik GmbH & Co. KG. (n.d.). Hellige pH meter: Simple soil testing kit. Retrieved from Hellige pH meter | pH Measuring Systems | Agricultural Measuring | Products | Pronova
Purpose: to estimate the amount of easily decomposable organic matter, an important source of energy for soil organisms and a driver of soil fertility.
Material needs:
Plastic bottle with 2 mm holes, 250-micron mesh bag, pre-weighed cloth, tube (e.g. cut-open plastic bottle) and rubber bands to mount cloth on, bucket, water (approx. 3-5 L), decanting cup (e.g., beaker with volume approx. 300-500 mL), ideally a spray bottle, one balance that is able to weigh 100 g of soil with precision of one decimal (0.1), and if available another balance that is able to weigh to a precision of 10 (0.01 g) or 1 mg (0.001)), spoon, ruler.
Time estimated: 20 minutes
Step-by-step instruction:
- Place the bottle with the 2 mm holes in the 250-micron mesh bag to form two "layers" of screen material through which the soil must pass. Either secure the mesh bag with a rubber band, or hold it firmly against the bottle during step 4.
- From the composite sample taken from all 5 sampling locations (see Soil Sampling Manual), weigh out 100g of soil. If possible, sieve the soil (5mm) and mix well. If the soil is not sieved, remove large stones and large pieces of organic matter (> 5mm). Use the open tube (cut plastic bottle) as funnel to add 100g (precision of one decimal) of the well-mixed soil sample to the bottle with holes. Make sure all soil enters the bottle but don’t worry if a little soil already leaks through the holes and the mesh while filling in. Put on the bottle cap.
- Holding the bottle inside the mesh, immerse and shake the bottle / mesh / soil vigorously in the bucket of water. Silt and clay particles will start to come out of the mesh bag. Take care that no soil leaves through the mouth of the bottle.
- After approximately 3 minutes, examine the material inside the bottle. This should contain only large roots and / or stones > 2mm to continue with the next step. If soil aggregates or lumps are still present, it is necessary to break them gently by inserting a stick into the bottle or simply continue shaking the bottle in the bucket.
- Once there are only stones and larger pieces of organic matter in the bottle, remove it from the bag and rinse the outside of the bottle with some water into the mesh bag, so that any material between 250 microns and 2 mm is kept in the bag and not lost.
- Some soils may contain very strong aggregates of soil that will hold together in the mesh bag, even after shaking. If you notice this, you should gently massage the bag with your hand to break up these soil crumbs and free any organic matter and clays that will be then rinsed in the next step.
- Rinse the mesh bag one more time in some clean water to make sure all clay and silt particles are removed.
- Release the contents of the mesh bag into a beaker used as decanting cup, measuring cup, or other. Use a spray bottle to wash all material in the bag into the container.
- Mount the pre-weighed cloth on the end of the plastic cylinder (cut-open jar or similar), using rubber bands.
- Decant the floating POM from the decanting cup into the plastic cylinder with the cloth attached, making sure that mineral soil particles (mostly sand) stay at the bottom of the decanting cup. Refill the decanting cup with water repeatedly, shake lightly to separate less dense POM from the mineral particles and pour into the cylinder with cloth attached. Make sure to separate most of the particles that look organic (darker), but that are left at the top of the layer of mineral particles (their density is between the density of the mineral particles and the density of POM). It may not be possible to capture every last piece of POM and at some point you will need to call the evaluation finished.
- Continue this decanting process until the water above the sand washed in the beaker is free of almost all particles, and nearly 100% of the POM has been captured in the cloth. When finished, rinse the sides of the plastic tube onto the cloth.
- For a semi-quantitative assessment of the amount of POM, move all material to the center of the cloth and distribute it to form a circle of approximately 1-2mm height. Use the ruler to measure the diameter of the circle.
- If a precise balance is available, dry the cloth with POM and weigh for a quantitative assessment (up to 3 decimals) and send us the weight. If no balance is available, place the dried cloth with the POM into a sealable plastic bag and store with the soil sample collected, and send it to us.
Video tutorial: https://youtu.be/cL_nWS_xWAw (To open the video, do not click on the link, but copy and paste it into your browser)
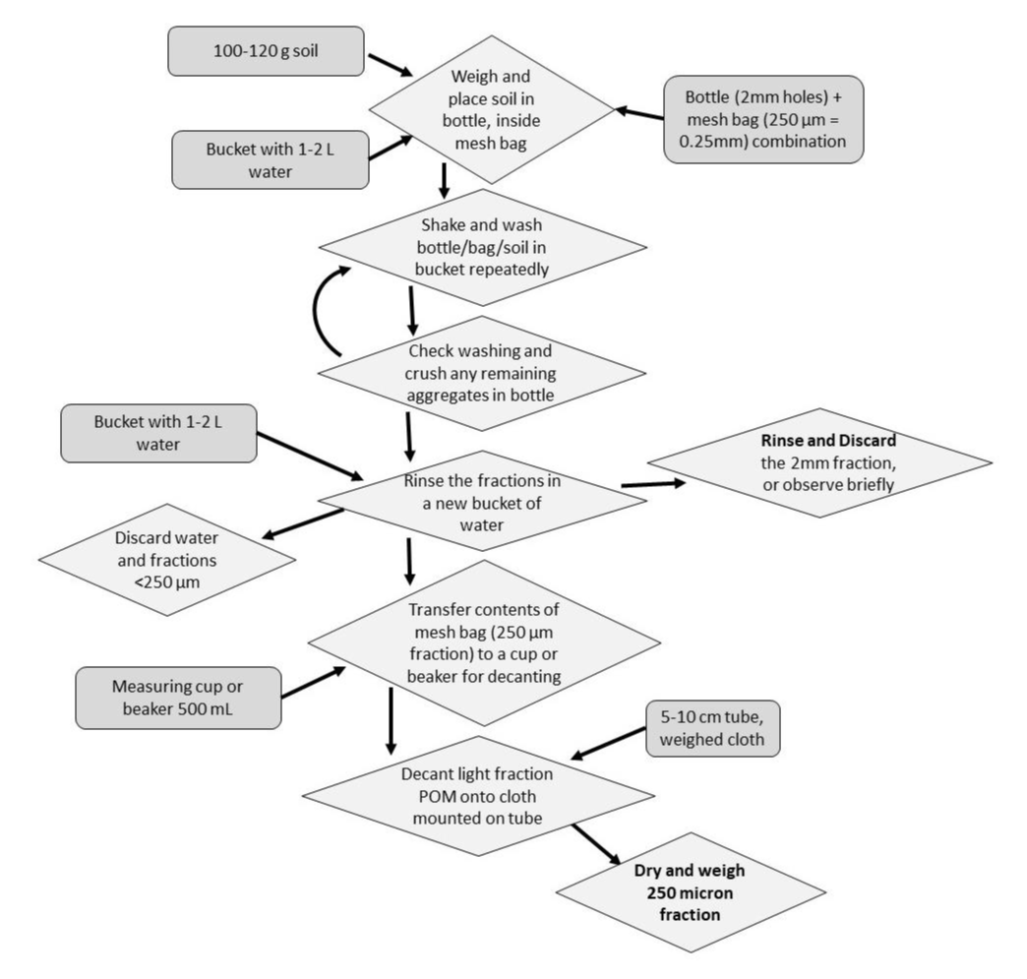
Figure 3 Flowchart for the streamlined POM method instructions.
Form
- Visual Score of POM circle: _______
- Initial (cloth weight) and final weight after drying: _______
- References
McKnight Foundation, Soil Health Evaluation Manual, Manual of Protocols: Soil Health Assessment, Version 6.4 July 2020
Soil Test 6: Penetration Resistance
Purpose: to identify compacted soil layers that may restrict root growth and water infiltration.
Material needs: metal rod (we used a 4mm rod from Bauhaus cut to 40cm), ruler
Time estimated: 5 minutes
Step-by-step instruction:
- Use the metal rod to probe vertically into the soil.
- While pushing the rod down, determine changes or differences in penetration resistance. Use a ruler to measure the depth at which resistance is observed.
- Record the depth of resistance.
Form
Note penetration resistance score:
0 – No resistance: Rod enters easily and can penetrate fully (no compaction perceived).
1 – Slight resistance: Rod enters with minor effort; continuous penetration.
2 – Moderate resistance: Noticeable effort; may hit a thin compacted layer; penetration often slows/stops around 10–20 cm.
3 – High resistance: Rod enters only with strong effort; penetration limited to ~5–10 cm.
4 – Very high resistance / refusal: Rod will not enter or bends readily at the surface.
Depth of resistances (record several if multiple exist): _______
Purpose: to measure how quickly water enters the soil, reflecting soil structure, compaction, and the risk of runoff or erosion.
Material needs:
Ring (16 cm diameter) with marked lines (to know volume), piece of wood, hammer, water (min. 2L), stopwatch (on phone)
Time estimated: 80 minutes, time needed can vary, depending on the soil properties.
Step-by-step instruction:
- Clear a new sampling area of surface residue, etc. If the site is covered with vegetation, trim it as close to the soil surface as possible without disturbing the surface. Avoid areas with visible disturbances such as ant nests, worm casts, rodent holes, or obvious cracks, as these can bias the infiltration rate.
- Using the hammer and block of wood, drive the ring, beveled edge down, to a depth of 7.5 cm (line marked on outside of ring) into the soil. If the soil contains rock fragments, and the ring cannot be inserted to depth, gently push the ring into the soil until it hits a rock fragment. Measure the height from the soil surface to the top of the ring in cm.
- With the ring in place, use your finger to gently firm the soil surface only around the inside edges of the ring to prevent extra seepage. Minimize disturbance to the rest of the soil surface inside the ring.
- Fill the ring gently (!) to the top mark with water. Record the amount of time (in minutes) it takes for the water to reach the different lines while infiltrating the soil. Stop timing when the surface is just glistening. If the soil surface is uneven inside the ring, count the time until half of the surface is exposed and just glistening.
Video tutorial: https://www.youtube.com/watch?v=YsEYs3YfkKE / https://www.youtube.com/watch?v=3PSroyhfXDM (To open the video, do not click on the link, but copy and paste it into your browser)
Form
- Time until water reached line 1: _______
- Time until water reached line 2: _______
- Time until water reached line 3: _______
Time until water reached line 4: _______
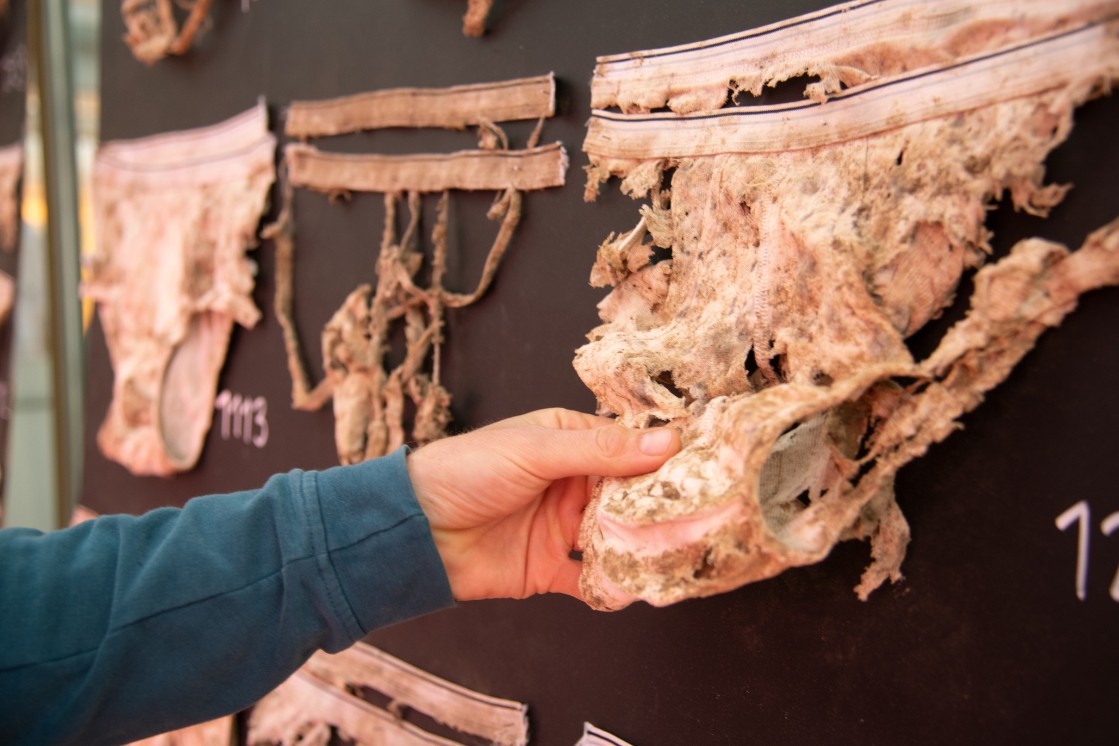
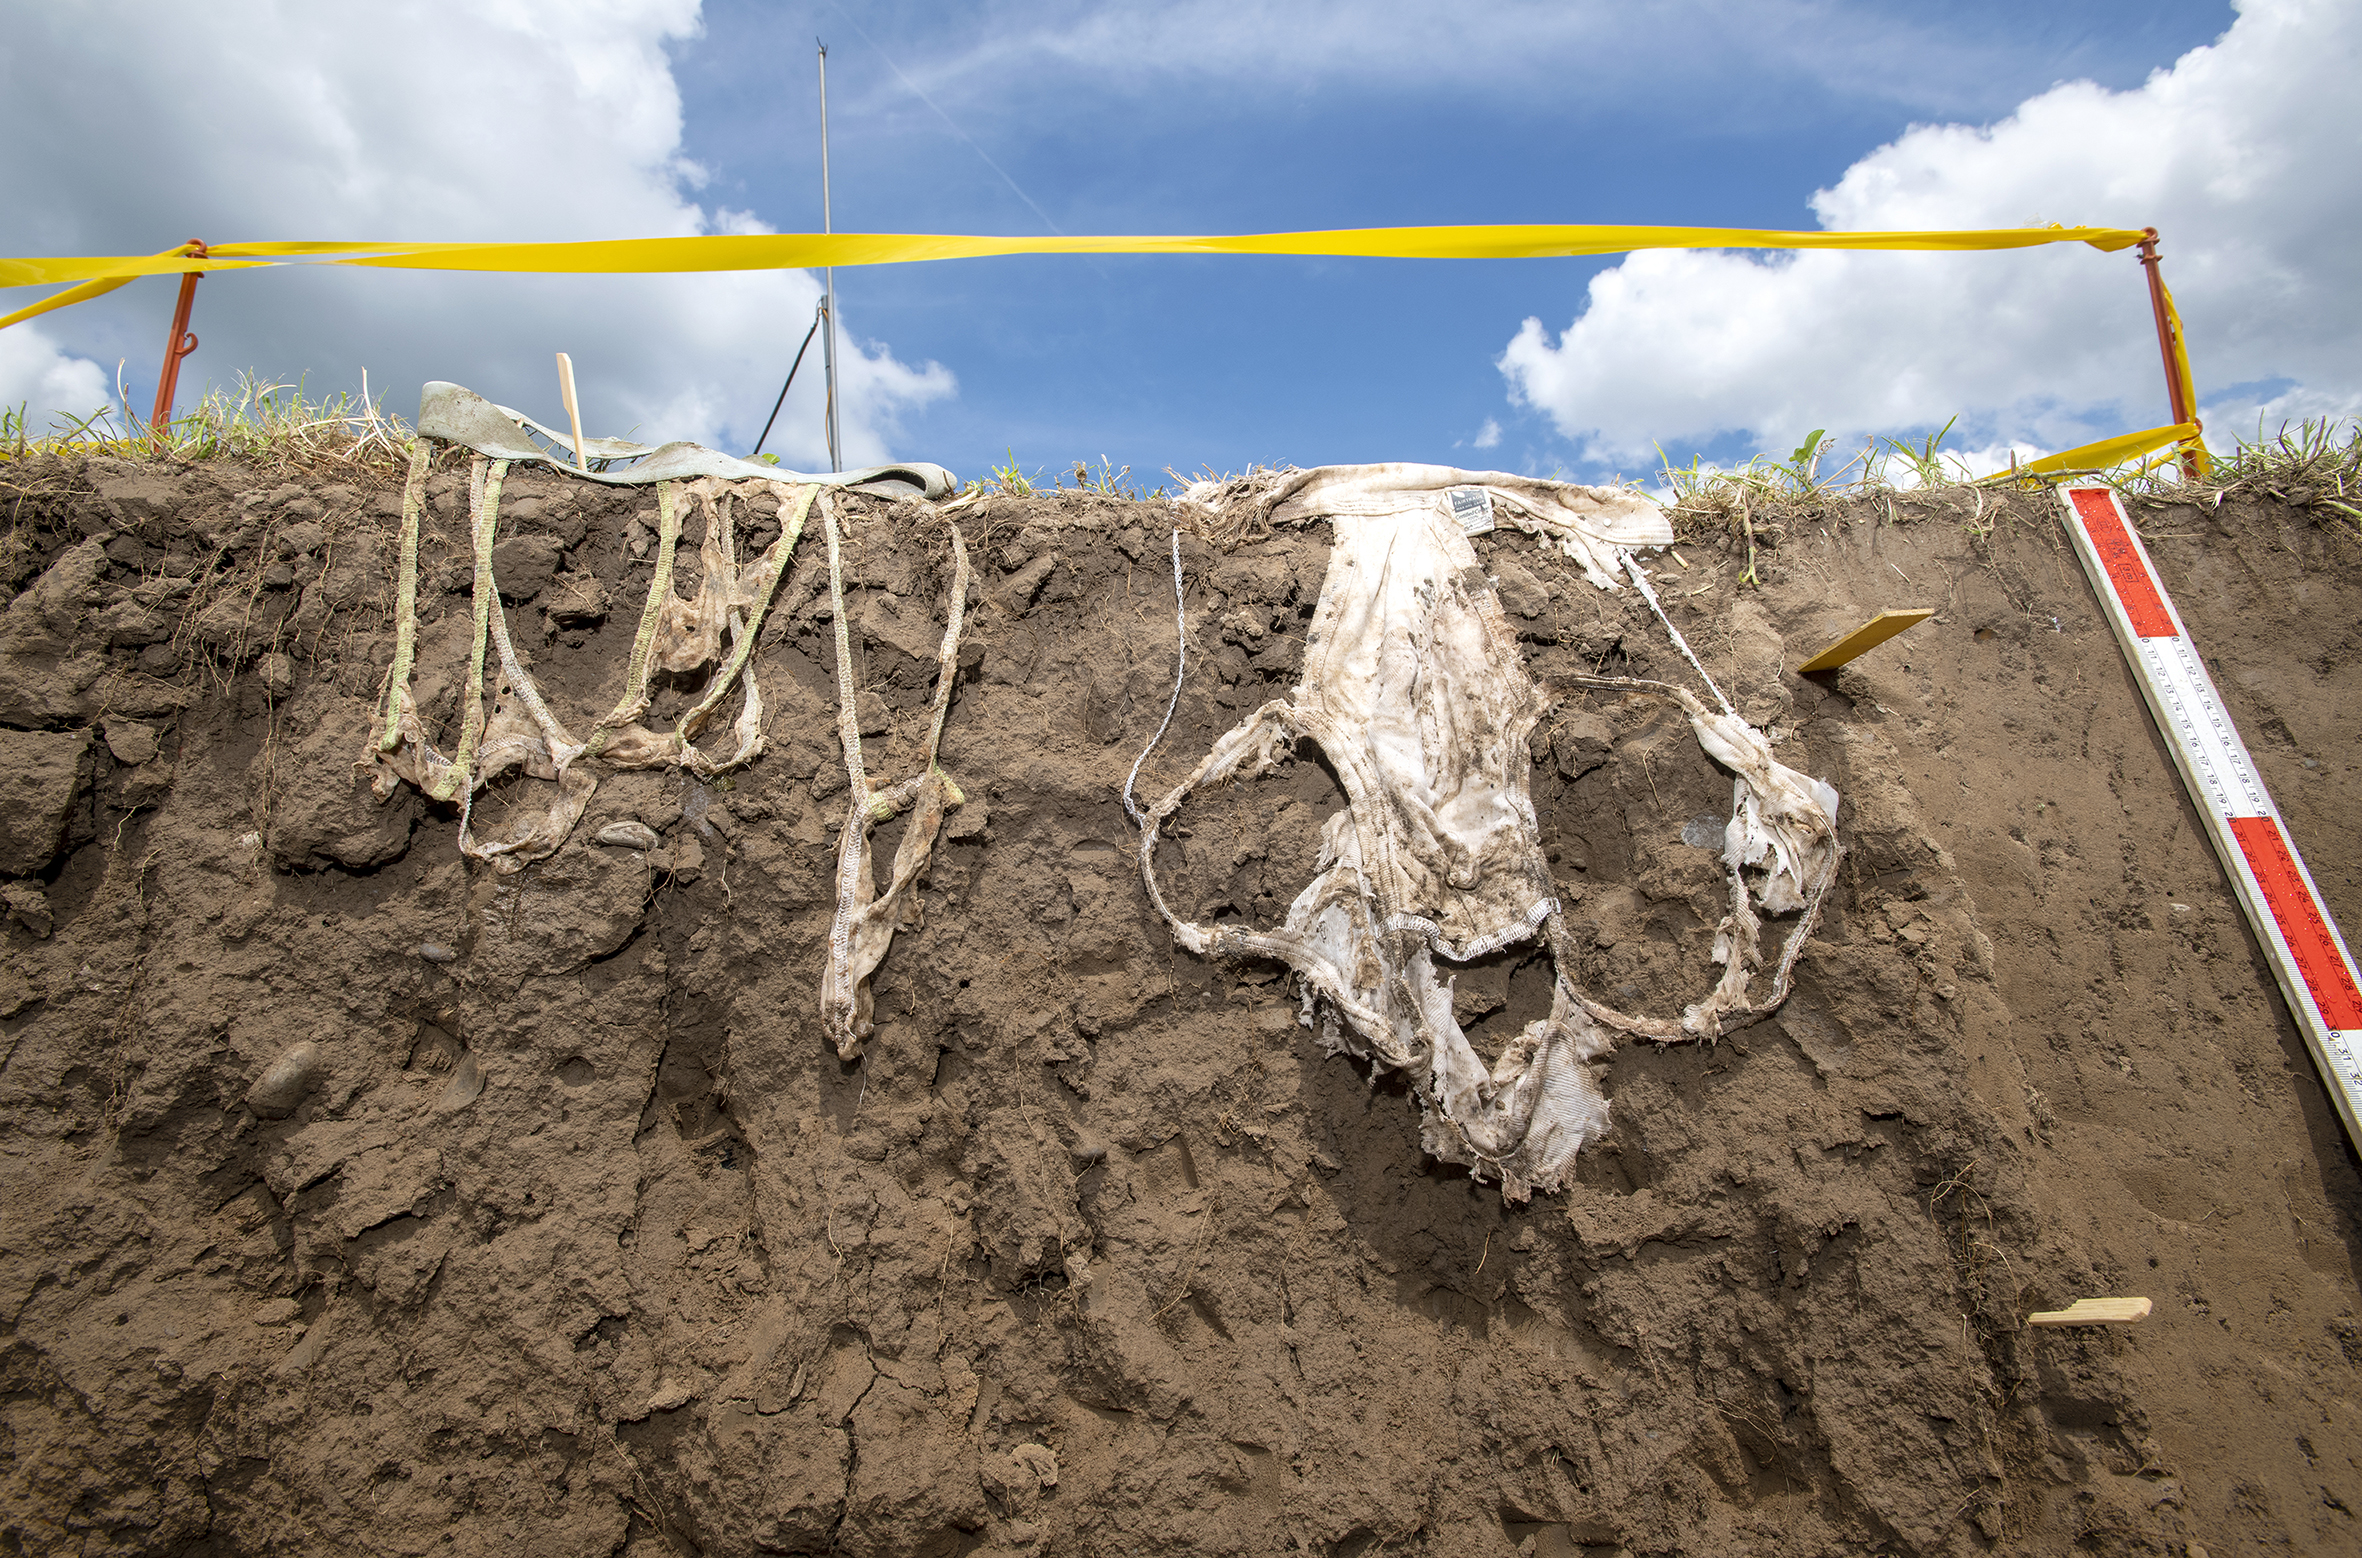
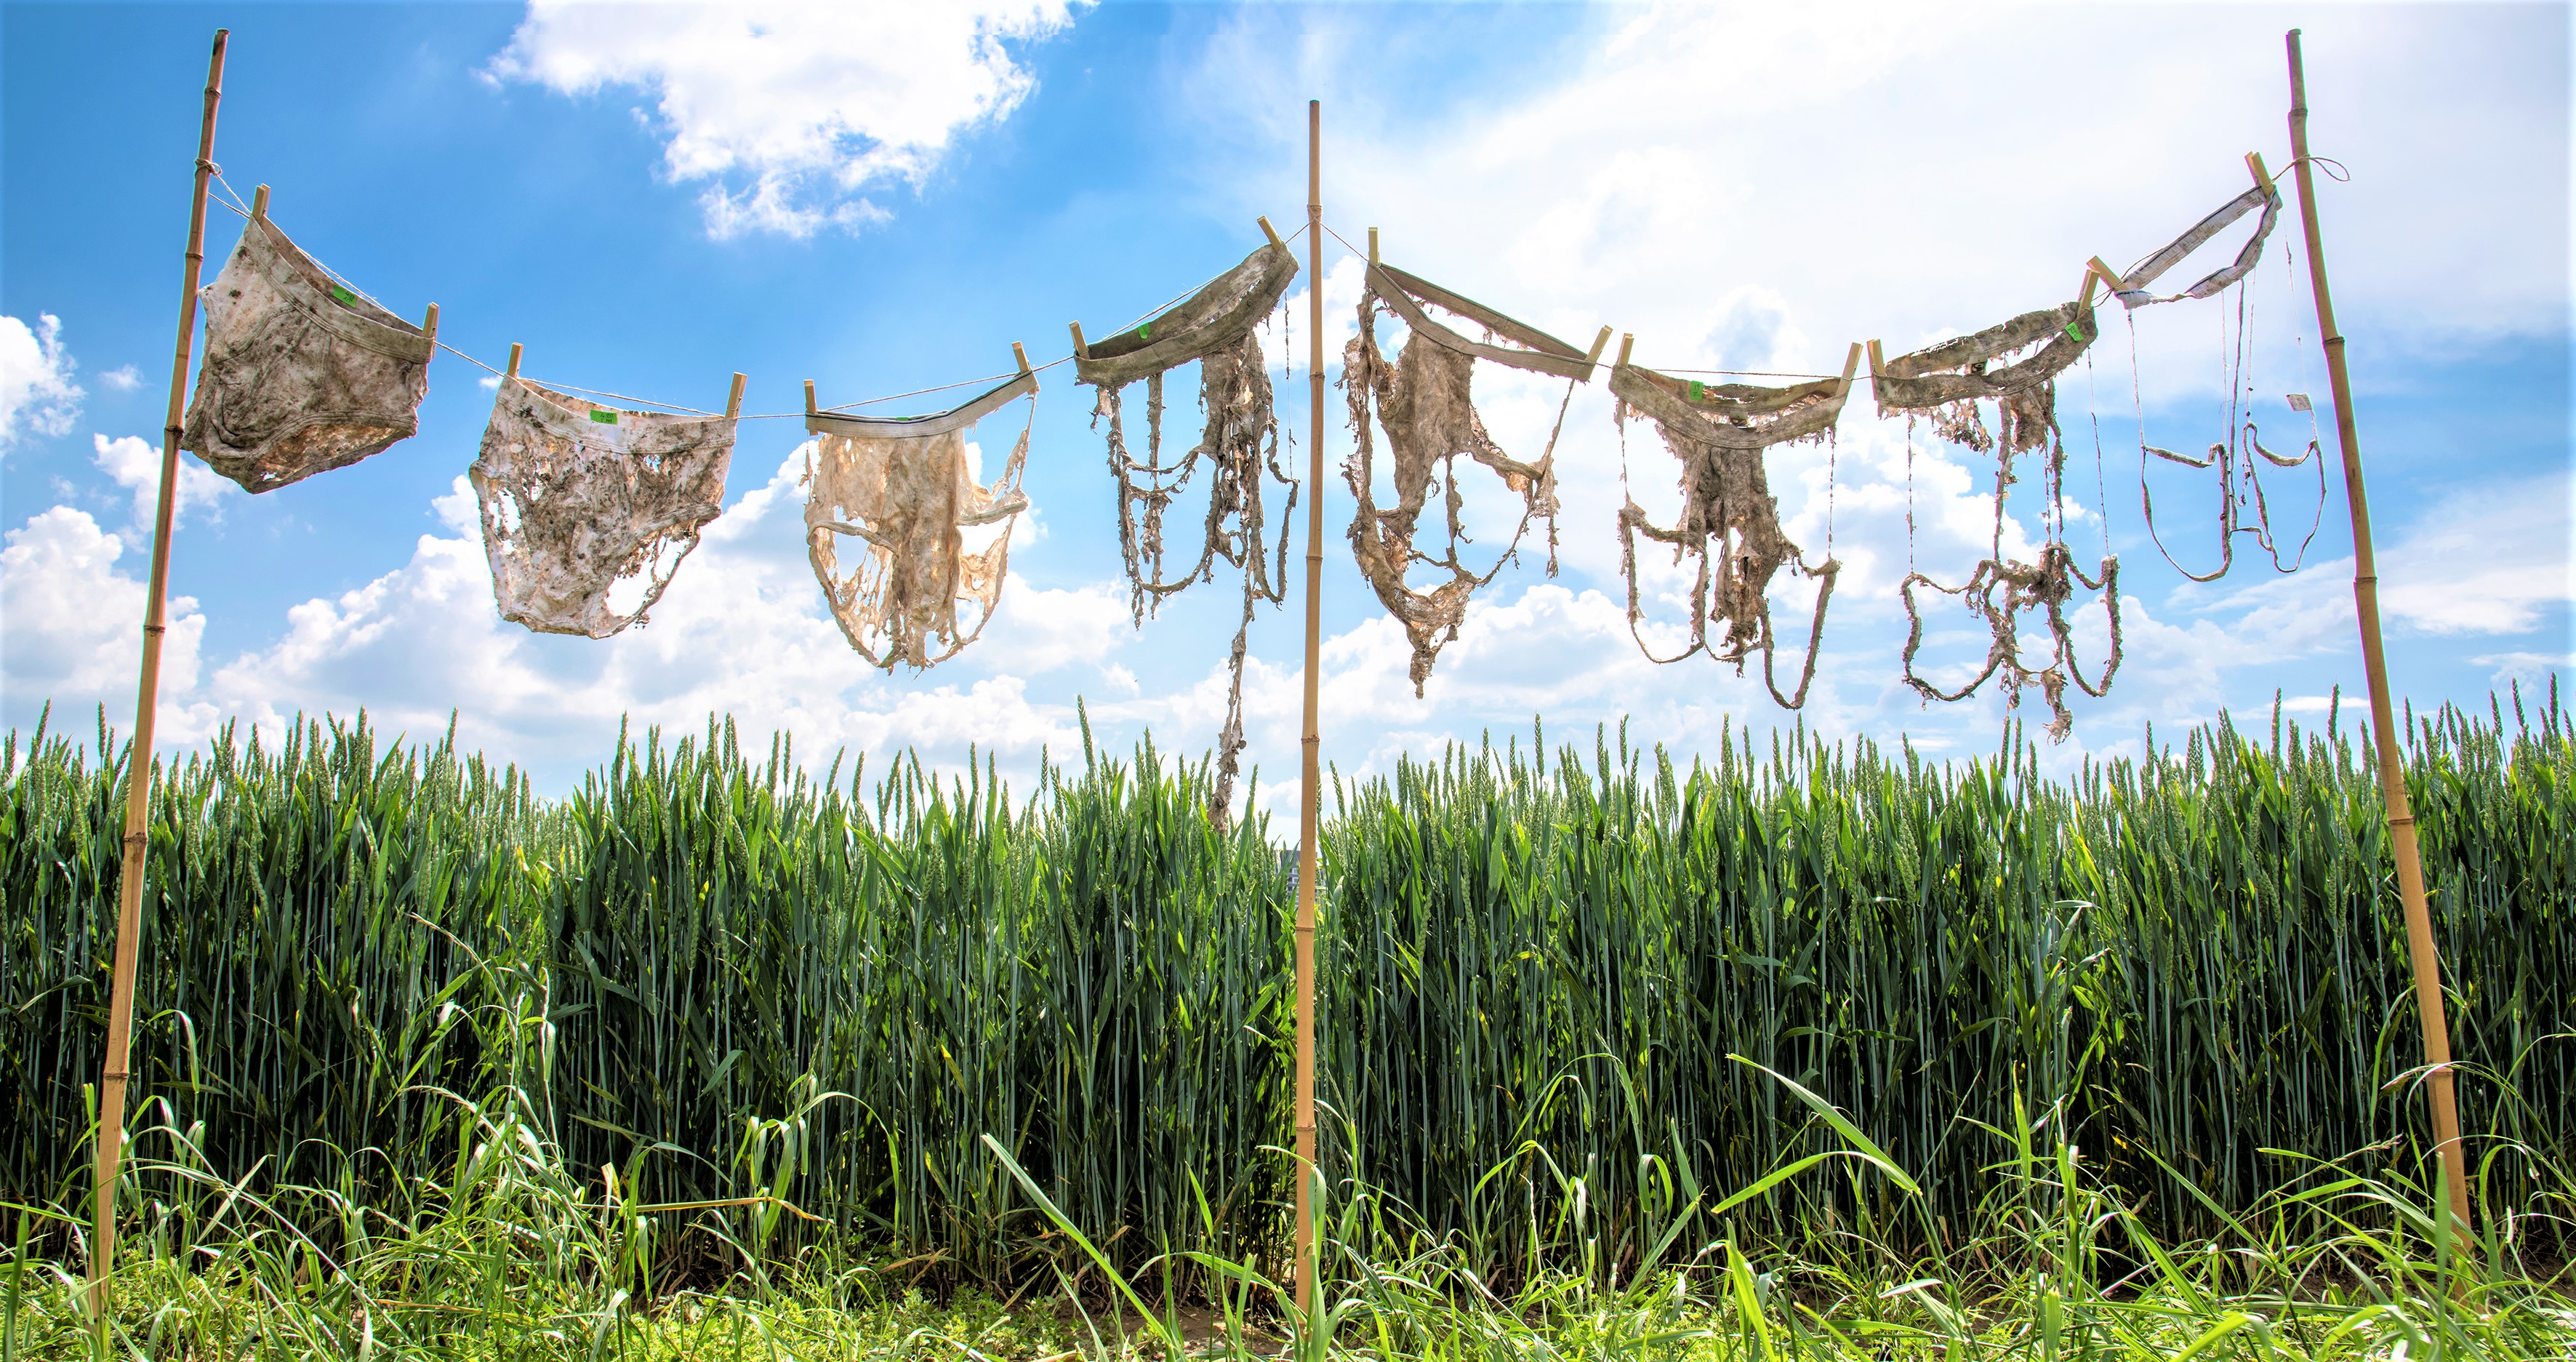
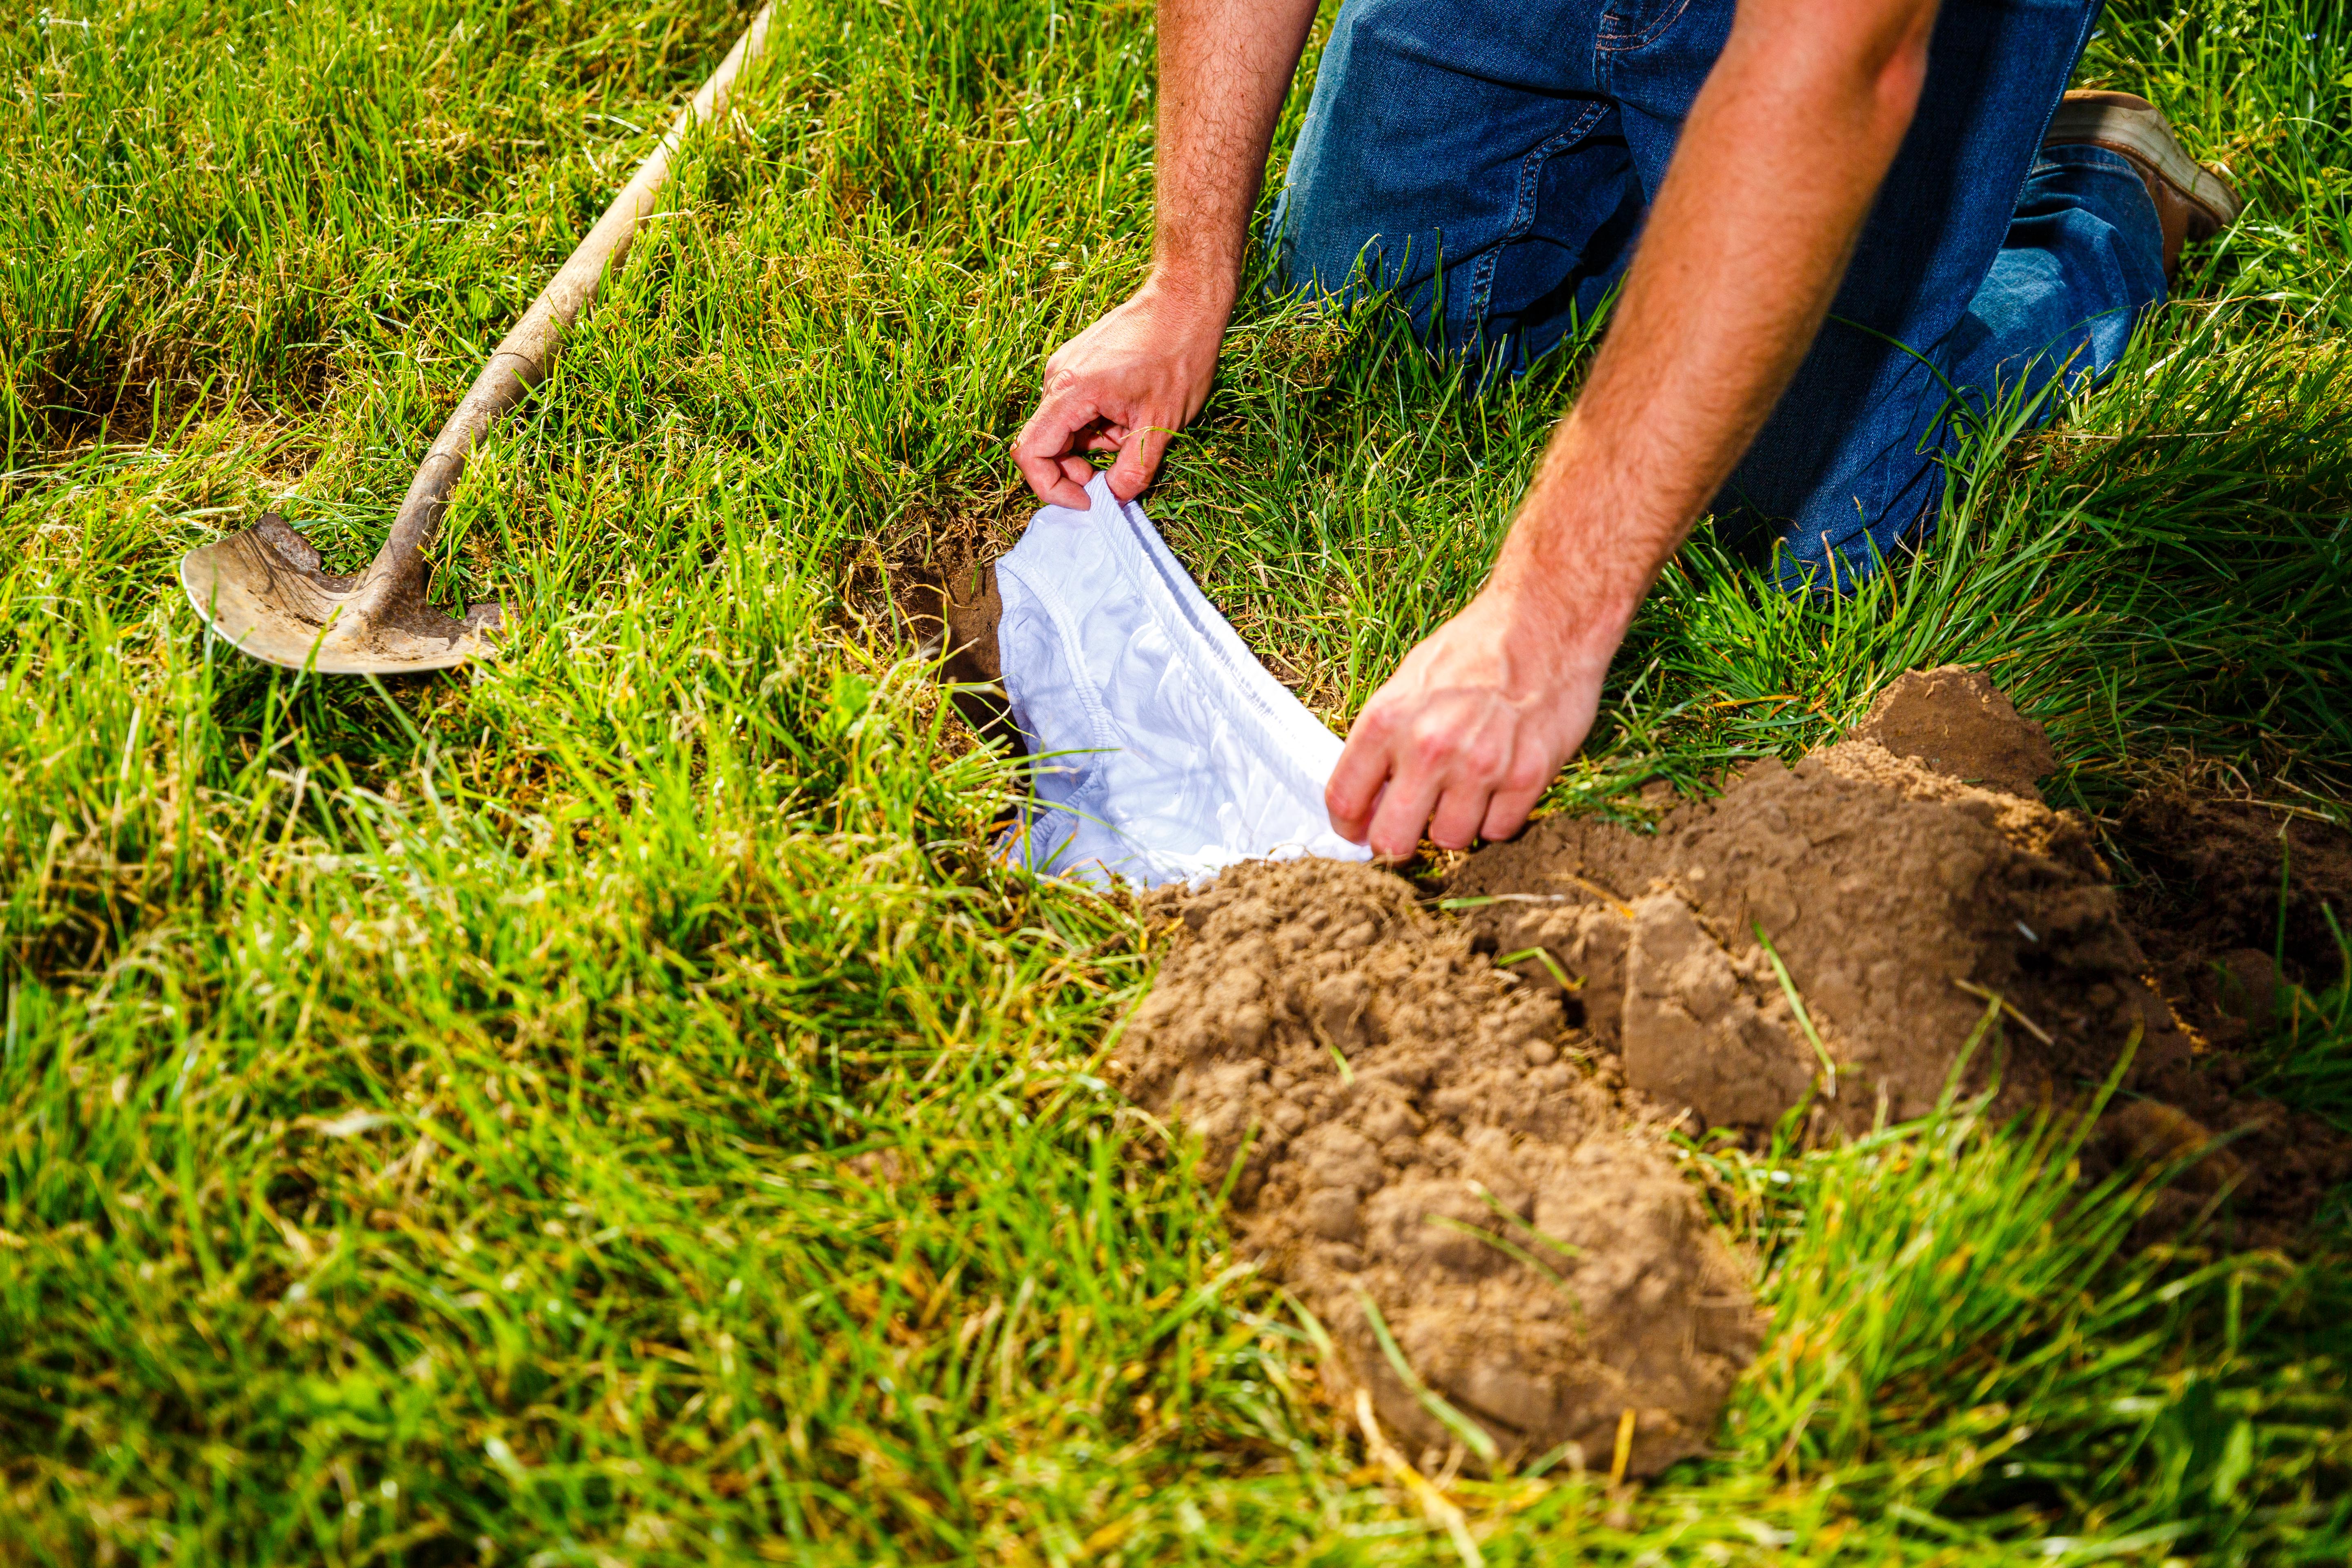
Purpose: to give a visual and engaging measure of soil biological activity and organic matter decomposition.
Material needs: Underpants (Coop Naturaline Herren Slip weiss S), spade, something to mark location, phone to photograph
Time estimated: 10 minutes
Step-by-step instruction:
- Remove the top soil layer with vegetation and put aside. Dig a hole of approximately 30cm depth and 50cm width, so that the underpants can be inserted vertically into the soil without folding the textile.
- Attach the underwear horizontally to the edge of a hole, with the waistband protruding just above the soil surface.
- If necessary, secure the waistband with a stone or your foot.
- Refill the hole with
Purpose: to give a visual and engaging measure of soil biological activity and organic matter decomposition.
Material needs: Underpants (Coop Naturaline Herren Slip weiss S), spade, something to mark location, phone to photograph
Time estimated: 10 minutes
Step-by-step instruction:
- Remove the top soil layer with vegetation and put aside. Dig a hole of approximately 30cm depth and 50cm width, so that the underpants can be inserted vertically into the soil without folding the textile.
- Attach the underwear horizontally to the edge of a hole, with the waistband protruding just above the soil surface.
- If necessary, secure the waistband with a stone or your foot.
- Refill the hole with soil in the same order as it was dug, start with the lower soil layer first, then place the upper soil layer on top.
- Replace the vegetated layer (if present) on top.
- Press everything down firmly so that the white waistband is still visible.
- Place the marker next to the underwear.
- After 8 weeks, carefully dig up the underwear again.
- Compare the degree of decomposition with the reference scale.
Video tutorial: https://www.youtube.com/watch?v=Wk_L34ufHg4; https://www.youtube.com/watch?v=5W1wE7obF10 (To open the video, do not click on the link, but copy and paste it into your browser)
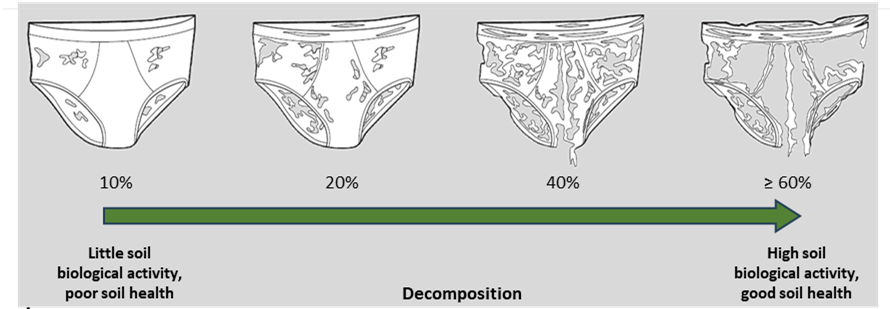
Figure 3 Degradation degree of soil underpants.
Form
- Time buried before excavation: _______
- Was the area watered?: Yes / No
- Degradation degree: 10% / 20% / 40% / 60%+ / don’t know / gone
- References
Beweisstück Unterhose. (2025, August). Anleitung 2024 [PDF]. Retrieved from https://www.beweisstueck-unterhose.ch/images/content/Aktion2024/2024_BSUH_Anleitung_A4_De_3-kombiniert.pdf
App herunterladen und registrieren
Standort beschreiben
Falls du kein Smartphone besitzt oder aus anderen Gründen lieber mit einem PC teilnimmst, navigiere zur Karte.
Wie hat es denn beim Kabarettisten Simon Enzler funktioniert?